An outline for full injection molding operation
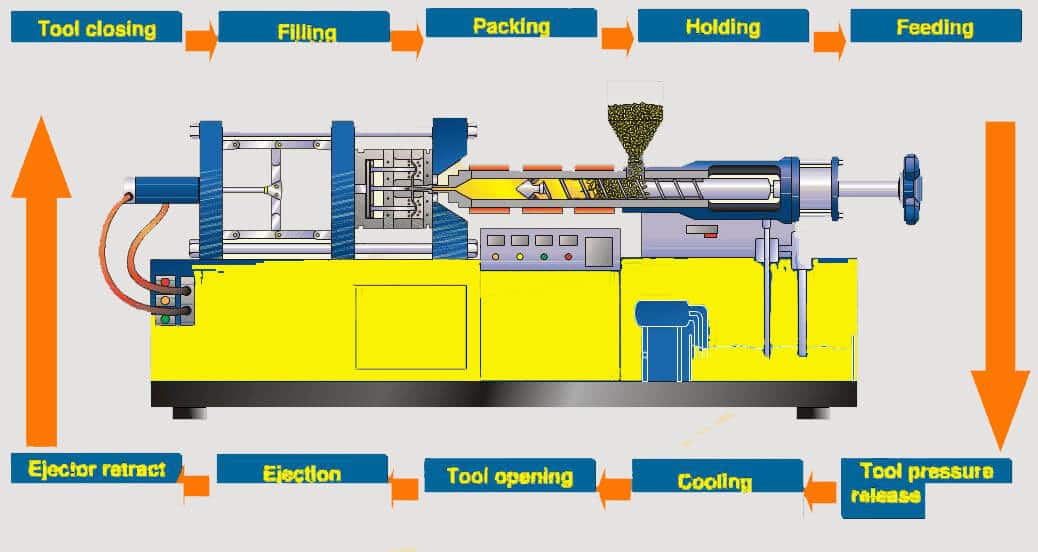
injection molding cycle
An injection molding operation is a process by which plastic materials molten in a mold are injected, and then cooled down, in order to achieve molded products. Methods such as this are suitable for mass-producing products with complex shapes, and play a major role in the sector of plastic processing.
A mold must be properly mounted and started up for production after it has been installed. This procedure will ensure that the mold is mounted correctly and protected properly.Choosing the right machine for your mold installation will depend on its size. The status of each machine should be ascertained after selecting one. The following items should be examined:
- Ensure that hydraulic oil is at the proper level.
- Heater bands have been installed and are functioning.
- Mold temperature controllers can be controlled.
- There is no oil in the injection cylinder, and the screw is in the forward position.
- A clean hopper is obtained by closing the hopper shutoff and wiping the hopper.
- Properly dried materials are available.
- The grainulator is in good working condition.
- The gates and mechanisms at the entrance work properly.
- A working vent hood is present.
- Clean and working heat exchanger.
- Lubrication or autolubrication on machine is working.
- Any light or alarm can be controlled.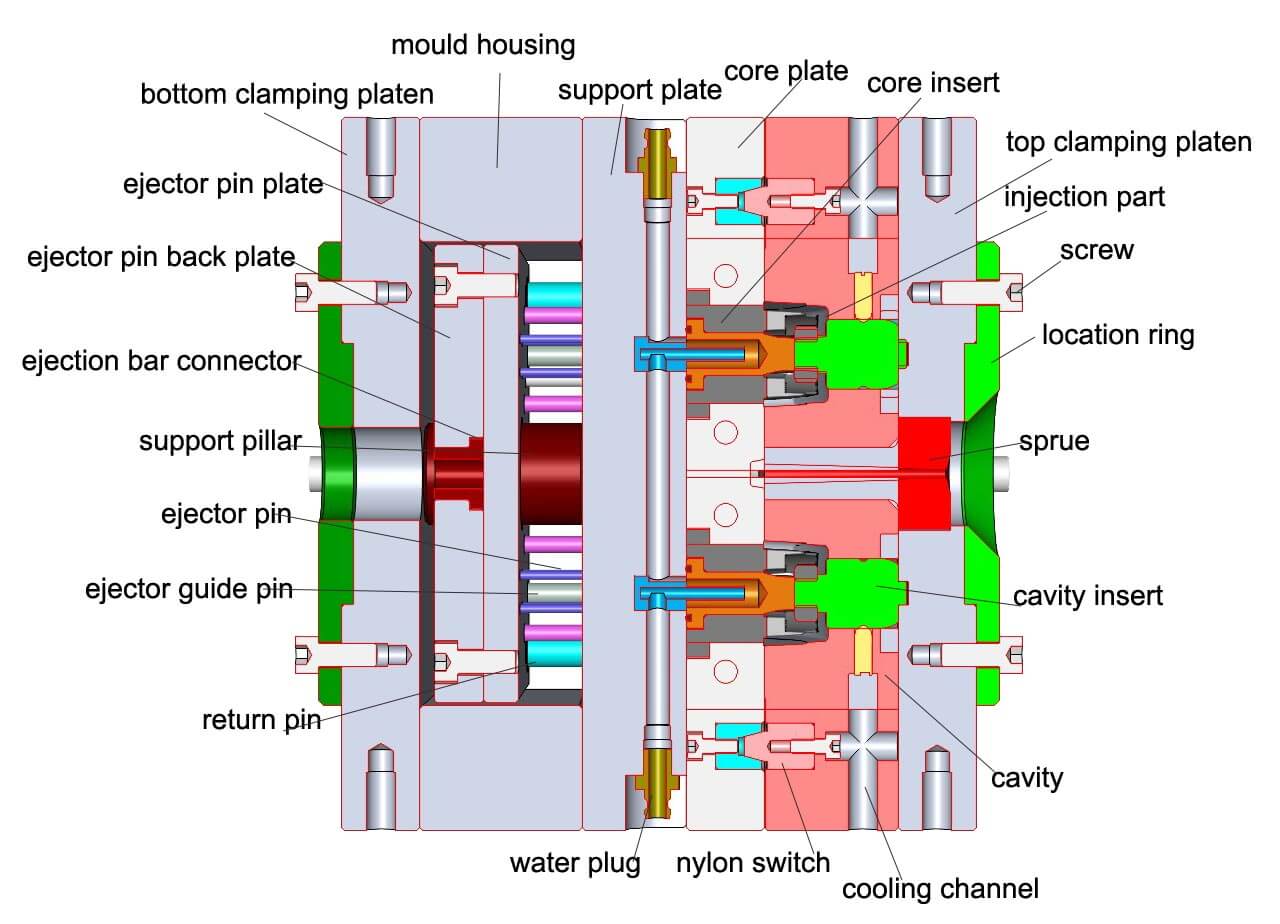
plastic mold
A mold is installed after the machine has been inspected. Although these steps are generic, it is strongly recommended that you follow them, as they are not specific to the machine. Follow the instructions from the manufacturer before beginning.
- Attach the connecting strap to the mold. It is supposed to secure the mold halves together and prevent them from falling apart during transportation. It usually refers to a metal stap mounted between two plates. Separating the mold into two halves is an unsafe and improper practice.
- Starting up the machine, setting the barrel heaters to the proper temperature, and switching the injection sled to the back position are all the steps. As outlined on the setup sheet, the profile should begin at a cool rear zone and move to a gradually hotter front area. Switch on the water supply to the feed throat.
- This is normally a dimension equal to twice the mold's height, so the damp needs to be open wide enough to accept the mold. A mold-open limit switch or control setting needs to be reset. Instructions can be found in the machine manual.
- Utilize a chain fall (or slide it in from the side) to lower the mold (or slide it in from the side), then manually align it with the stationary platen. Make sure the mold is resting freely against the platen. A chain fall is adjusted toward the platen for this purpose. A thick metal plate placed over the lower tie bars is a good idea for all molds except those with the largest shafts. As a safety precaution, the plate will catch the chain if it falls or if the connecting hook opens.
- In order to properly position the mold at this point, it must be raised and lowered a bit in order to allow the locating ring on the mold to fit over the locating hole on the platen. A chain fall should tilt the mold slightly at top when connected
- Placing the tilted mold slightly above the hole of the stationary platen as you lower it, hold it against it. The locating ring falls into the locating hole of the platen when the mold is gently lowered. The mold can be aligned on the platen by placing a level across its top. Clamps can then be placed once the mold's A halves have been leveled.
- A half of the mold should be clamped to the staging platen and adjusted. Mount each corner of the mold with a clamp. In cases where the mold has a very wide or large dimensions, additional clamps need to be used along the long dimensions. There may be some situations in which only two clamps are necessary for a very small mold; however, this is not recommended. For each mold half, a smaller, specially constructed clamp might be required.
Make sure the clamp heel is separated from the platen in order to achieve best results. The clamping force is applied to the platen as a result of the toe of the clamp pressing against the surface. In a clamp, the heel should only be .125 - .25" tall. This angle should be as small as possible. By providing a slotted clamp, the bolt can be positioned as close to the mold as possible to provide as much clamping pressure on the mold as possible.
- The mold must contain ejector rods if they are needed. After the clamp unit is placed under low pressure, it can be slowly moved forward to prepare to clamp the B half of the mold. Adjusting the settings or limit switches may be necessary at this point. This information can be found in the machine manual. Place the moving platen between 6.4-12.7 mm of the mold base, then set a point at which the "high pressure close" will activate. Once you reach the point at which the clamp unit touches the mold base, stop moving it.
As the clamp pressure is built up, adjust the press accordingly. Doing so ensures that the mold has closed completely.
- Make sure the machine is turned off. In the B half of the mold, clamps, adjustments, and bolts are to be applied, as shown previously.
- Upon removing the chain fall hook, eyebolt, and connecting strap, proceed as directed. Keeping the connecting strap mounted, but swinging it out of the way with a tightening screw might be best. That way, it won't fall off and cause mold damage.
- Make sure that all clamps are secure on both halves. Inspect the clamp unit for binding and snagging as you slowly move the mold halves apart during clamping. Allow 10 mm between the mold halves and stop. Be sure to properly mount and tighten all clamps on the mold after turning off the machine.
- The machine should be started and the mold should be slowly opened until the B half is free from the A half. The process should be stopped when the B half is completely separated from the A half. For the part to freely fall after ejection, this depth is normally two times its depth. Molds may be opened past this reference point, but not beyond the minimum, since that would take a long time. It is a good idea if possible to keep the slides or other action in the mold intact after full open ing if possible. The mold is less likely to break this way. If you notice damaged springs, replace them.
- Set ejection options after ensuring action locations are within proper boundaries. It shouldn't pulsate when ejection occurs. Taking out parts should take just one stroke. When this does not suffice, there is something wrong that needs to be corrected before production can proceed. When ejection is positioned on the B half of the mold, the stroke length should not exceed two and a half times the part's depth. Only the amount of ejection that is required to free the plastic from the mold in the B half should be used. Going beyond that will only prolong the process.
- Ensure all moving parts are lubricated, including ejector guides and leader pins. Eliminate traces of lubricant. Cleaning the cavities gently is recommended. Shut off the machine after closing the mold.
- Hose lines should be connected to the mold temperature control unit. Make sure the cooling lines of the mold are clear of obstructions and observe the correct path for connecting the hoses. It's not necessary to loop A half and B half together, and the lines for both halves must be connected separately and controlled separately. If the mold falls or opens, make sure the hoses won't be crushed or stretched by kinks. Install the temperature control units, then check that they are properly attached, then set the appropriate temperature. Tighten or repair any leaks as needed.
- Make sure all clamps are in good working order.
- Test the barrel's temperature. To maintain evenly distributed preset temperatures, the barrel usually needs 45 minutes to an hour. Be sure that all heater bands are connected correctly and operating.
- A close hopper feed gate and a correctly positioned hopper magnet should be checked. Fill the hopper with fresh material. The last material in the barrel may require a purging compound first.
- Once the barrel has reached the preset temperature, open the feed gate on the hopper and leave it open for 10 to 15 minutes. The material will fall into the cylinder as the feed throat opens. Make sure the screw is in the forward position right now.
- Perform the following steps to purge the machine.
- The injector screw should have remained upright during the last job. That position should be maintained until the material for the air shot is ready. As the screw rotates, fresh material will be sucked into the banel. When the new material is brought forward, the screw will begin spinning freely at first, but slow down as it is loaded with fresh material.
- Setting the screw return limits will allow the screw to return to the desired point. Upon returning to the set point, the screw will stop rotating. A sufficient amount of time must be allowed for the heat to be absorbed by the material that was brought forward. A couple of seconds is usually sufficient.
- Take three air shots while the sled is still in the back position. During an air shot, material is injected into the air and allowed to accumulate on a special plate designed to capture any purge. Allow sufficient time between each air shot to allow the upcoming material to reach the right temperature. Most of the time, this amount is equal to the total cycle time of the job that will run in production. The melt temperature of material injected during air shots must be measured with a fast-acting pyrometer and probe. This temperature must be maintained throughout the mold-making process. As necessary, adjust the settings. A 10 or 15-shot air blast may be necessary to clear an old material when using a different material or color.
- Establish all of the injection and cycle limits. Several injection parameters need to be considered, such as injection speed, pressure, holding pressure, cushion distance, cooling time, opening and closing settings for the mold, and others as necessary.
- Make sure the first shot is loaded with material. To absorb the force of the injection sled against the sprue bushing, bring the injection sled forward until the nozzle is positioned against the sprue bushing on the closed mold. Molds may have been opened at this point, which makes it possible for the A half to fall off the platen. Sliding controls should be locked.
- Ensure that the clamp unit is fully extended before opening the mold.
- Choose whether the cycle indicator shows "Manual," "Semiautomatic," or "Automatic," according to your needs.
- Initiate the first cycle by closing the safety gate.
- Watch how injections are performed. To begin, set the pressure and feed for a short shot. A proper molded part can be achieved by adjusting feed and pressure settings until a desired result is obtained. Take 15-20 shots in a row and don't rush it.
Even when a mold is on automatic cycles, it must be monitored to make sure particulate parts don't stick to it and that everything is working correctly. Clean and lubricate the mold periodically, based on the type of material and complexity of the mold. When cleaning molds, it is advisable to use a cleaner designed specifically to do the job.
In areas such as vents, a light-colored nylon scrub pad should be used for gitation. The lighter colors indicate mild abrasion, while the darker colors indicate aggressive abrasion. Molds should only be cleaned with a sponge, never with scouring powders or steel wool pads.
It is preferable to avoid mold releases altogether unless absolutely necessary, but if it is absolutely necessary, use it sparingly. Many people believe that if a little is good, more must be better. However, that is not accurate regarding mold release.
It is imperative to investigate the origin of mold releases and correct the cause when possible if mold releases must be used. Especially slides, cams, and lifters become gummed up by mold release. Mold can be severely damaged as a result.
For molds that are expected to run for a long time (30 days or so), it is advisable to stop it periodically, clean it, lubricate it, and inspect it for any malfunctions. Clean and test water-lines by removing them, flushing them with acid, and flushing them. Check for peening along the dividing lines. You should examine the entire mold for nicks and burrs, including the sprue bushings.
Molds should be sealed when a run of production has been completed.
The last shot from a mold should be saved. In order to inspect the mold later, it is necessary to do this step. This aids mold repair personnel in determining what needs to be done in order to prepare it for the next run. When possible, this last shot should include a complete part, including runner and spruce with the segments still attached.
https://www.plasticmoulds.net/injection-molding-operation.html


Comments
Post a Comment